


 400 998 0226
 Tableau


 Tableau
 Minitab


 Alteryx


 Neo4j
Neo4j


 Talend


 IM
IM


 华为云
华为云 腾讯云
腾讯云 IT/安全
IT/安全


示例:安装和配置三节点 HA 群集
- 版本 :2022.1 及更高版本
Tableau Server 的多节点高可用性安装有助于最大限度地提高 Tableau Server 的效率和可用性。配置多节点 Tableau Server 部署时,您执行的步骤旨在构建冗余,从而有助于减少潜在的停机时间。
除了通过将服务器进程移动或添加到其他节点来提高效率之外,您还可以通过满足以下要求来创建 Tableau Server 的高可用性 (HA) 安装:
添加其他节点,总共至少三个节点
在至少三个节点上部署协调服务整体
在至少一个附加节点上添加客户端文件服务 (CFS) 的实例(我们建议在运行协调服务的每个节点上添加一个实例)
在其中一个附加节点上添加文件存储的第二个实例(如果数据引擎尚未安装在节点上,则将自动安装)
在其中一个附加节点上添加存储库 (pgsql) 的第二个实例
包含这些新增功能的 Tableau Server 安装将具有内置冗余,并且可以在存储库出现问题时支持故障转移。此示例演示如何执行此操作,以及更多内容。
单服务器系统
在初始节点上安装 Tableau Server 后,您就拥有了一个运行正常运行所需的一切的系统。它至少具有所有服务器进程的一个实例,是 Tableau Server 的最基本配置。它没有冗余。服务器拓扑如下所示(未显示某些特定于 TSM 的进程):

三节点系统
要构建冗余,您需要添加其他节点来托管存储库以及数据引擎和文件存储进程的实例。您可以添加其他进程的实例,包括节点上进程的多个实例。此外,为了减少系统的漏洞,您可以运行多个网关和某些服务器进程的其他实例。实现此配置所需的最少计算机数为三台。
在下图中,文件存储进程已添加到两个附加节点。存储库的第二个被动实例也已添加到其他新节点之一。最后,服务器进程(以蓝色显示)已添加到其他节点以提供冗余。

Configuration steps
This procedure describes how to configure a three-node HA Tableau Server cluster with two repository instances and two file store/data engine instances on the additional nodes as pictured above.
Before you begin
Before you install Tableau Server on any additional nodes, ensure that each additional node meets the distributed requirements. See Distributed Requirements for details.
Note: This operation includes steps that you may need to perform using the TSM command line. To use the TSM CLI you need administrator access to the command line on one of the nodes in your installation and TSM administrator credentials to run TSM commands.
Step 1: Install the initial node
See Install and Configure Tableau Server.
Step 2:Generate a bootstrap file for the additional nodes
Open TSM in a browser:
https://
For more information, see Sign in to Tableau Services Manager Web UI.
Click the Configuration tab, and in the Add a Node box, click Download Bootstrap File.
The bootstrap file is created and copied to your local computer.
Beginning with version 2019.3, embedded credentials are included in the bootstrap file by default. If you don't want credentials embedded in the bootstrap file, clear the Include temporary credentials in file option. See What's New and Changed in Tableau Server in What's New for more information. If you want to completely disable the ability to include embedded credentials in node bootstrap files, you can set a configuration option for the server. See features.PasswordlessBootstrapInit for more details.
Step 3:Install and initialize an additional node
Copy the original installer you used on the first computer along with the bootstrap file you generated and put them in a location accessible from the new computer you are adding Tableau Server to. This could be a mounted network share, or directly on the new computer.
If you are running a local firewall, then you need to configure firewall rules for all the nodes in the cluster. For more information, see Local firewall configuration.
On the new node, run the Tableau Server Setup program. This should be the same installer program you ran on the initial node to install Tableau Server. Accept the terms of the license agreement and click Next.
The Install location must be the same on every node in the cluster.
During installation you will be asked to select an installation type. Select Add additional node to existing Tableau Server cluster:

Click Next to continue.
If you are prompted by Windows Defender Firewall, click Allow access. You may need to do this multiple times for the installation to complete.
In the installer, after the Tableau Server files are copied, you will be prompted to provide the bootstrap file and the name and password of the TSM administrator:

Click Next to continue.
Enter the location of the bootstrap file, or click Browse to navigate to the location. If the bootstrap file does not include embedded credentials, or those credentials have expired, enter the TSM administrator username and password. These credentials must be the credentials of the user that you used during the installation process on the initial node.
A browser window opens and you are prompted to sign in to TSM. Enter the TSM administrator user name and password.
If no browser window opens automatically, open a window and navigate to TSM:
https://In TSM, click Configuration.
A message displays, telling you the node was added:

Click Continue.
Step 4: Install and initialize a second additional node
Copy the original installer you used on the first computer along with the bootstrap file you generated and put them in a location accessible from the new computer you are adding Tableau Server to. This could be a mounted network share, or directly on the new computer.
If you are running a local firewall, then you need to configure firewall rules for all the nodes in the cluster. For more information, see Local firewall configuration.
On the new node, run the Tableau Server Setup program. This should be the same installer program you ran on the initial node to install Tableau Server. Accept the terms of the license agreement and click Next.
The Install location must be the same on every node in the cluster.
During installation you will be asked to select an installation type. Select Add additional node to existing Tableau Server cluster:
Click Next to continue.
If you are prompted by Windows Defender Firewall, click Allow access. You may need to do this multiple times for the installation to complete.
In the installer, after the Tableau Server files are copied, you will be prompted to provide the bootstrap file and the name and password of the TSM administrator:
Click Next to continue.
Enter the location of the bootstrap file, or click Browse to navigate to the location. If the bootstrap file does not include embedded credentials, or those credentials have expired, enter the TSM administrator username and password. These credentials must be the credentials of the user that you used during the installation process on the initial node.
A browser window opens and you are prompted to sign in to TSM. Enter the TSM administrator user name and password.
If no browser window opens automatically, open a window and navigate to TSM:
https://In TSM, click Configuration.
A message displays, telling you the node was added:
Click Continue.
Step 5: Configure the new node with a minimum topology
To complete the process of adding new nodes to your cluster, you need to configure them with a minimum topology. With a minimum topology, the only pending change will be the addition of Cluster Controller, which is required on each node. If you want other processes on the nodes you can add most of them at the same time. This example only configures the nodes with Cluster Controller.
Open TSM in a browser:
https://
For more information, see Sign in to Tableau Services Manager Web UI.
Click the Configuration tab. A message should tell you that new nodes were added.
Click Continue to dismiss the message.
Click Pending Changes at the top of the page:

If you are configuring a cluster with three or more nodes, a Coordination Service ensemble warning displays. You can continue. You will deploy a Coordination Service ensemble in a separate step.
Click Apply Changes and Restart and Confirm to confirm a restart of Tableau Server.
When Tableau Server restarts, the nodes are included with the minimum topology necessary.
Step 6: Deploy a Coordination Service ensemble
If you install a total of three or more nodes, you should also deploy a Coordination Service ensemble. If you do not, you will get a warning message every time you make changes to the server configuration or topology. You can ignore this message, but as a best practice you should deploy a multi-node Coordination Service ensemble.
When you install Tableau Server, a single instance of the Coordination Service is installed on the initial node. TSM and Tableau Server depend on the Coordination Service to function properly, so to provide redundancy and ensure availability on multi-node installations, configure additional instances of the Coordination Service by deploying a Coordination Service ensemble. Coordination Service ensembles are installed with one, three, or five instances of the Coordination Service. In a three-node installation of Tableau Server, the recommended number of Coordination Service instances is three, one on each node.
Do not attempt to deploy a Coordination Service ensemble if there are other changes pending. Discard or apply any pending changes before deploying a new Coordination Service ensemble.
Note: This operation includes steps that you may need to perform using the TSM command line. To use the TSM CLI you need administrator access to the command line on one of the nodes in your installation and TSM administrator credentials to run TSM commands.
The following steps illustrate how to deploy a new Coordination Service ensemble on an existing three-node Tableau Server cluster and clean up the old ensemble.
On the initial node, open a command prompt as administrator.
Stop Tableau Server:
tsm stopIf prompted, sign in as a TSM administrator.
Some TSM processes will continue to run, including the Administration Controller and Administration Agent.
Confirm there are no pending changes:
tsm pending-changes listIf there are pending changes, you need to either discard the changes or apply them. Applying pending changes will take some time:
Wait until the command completes and you are returned to the system prompt.
Discard the changes
tsm pending-changes discard
Apply the changes:
tsm pending-changes apply
Get the node IDs for each node in the cluster:
tsm topology list-nodes -vUse the command to add a new Coordination Service ensemble by adding the Coordination Service to specified nodes. You must specify the node(s) that the Coordination Service should be added to. The command also makes the new ensemble the "production" ensemble (the ensemble in use) and removes the old ensemble, unless the deployment fails. If this happens, see step 6 below.
tsm topology deploy-coordination-serviceNote: A "y/n" prompt displays confirming that a server restart will take place. To run the command without input, include the option.
--ignore-promptFor example, deploy the Coordination Service to all three nodes of a three-node cluster, where the nodes are node1, node2, and node3:
tsm topology deploy-coordination-service -n node1,node2,node3Wait until the command completes and you are returned to the system prompt.
(Optional) If the deployment fails, you need to run the command to remove the unsuccessfully deployed ensemble. For details on running the command, see tsm topology cleanup-coordination-service.
tsm topology cleanup-coordination-serviceStart Tableau Server:
tsm start
or
For more information and details on deploying a new Coordination Service ensemble, see Deploy a Coordination Service Ensemble .
Step 7: Configure Client File Services (CFS) on additional nodes
Add CFS to additional nodes. We recommend you add CFS to every node running the Coordination Service.
Note: This operation includes steps that you may need to perform using the TSM command line. To use the TSM CLI you need administrator access to the command line on one of the nodes in your installation and TSM administrator credentials to run TSM commands.
On the initial node, open a command prompt as administrator.
Find the node ID for the node you are adding CFS to:
tsm topology list-nodes -vAdd CFS on the node by specifying the node, the process, and a single instance.
For example, this command adds an instance of CFS to node2:
tsm topology set-process -n node2 -pr clientfileservice -c 1If you attempt to add an instance of CFS to a node that already is configured with CFS, an error message will let you know there is already an instance on the node.
To add CFS to additional nodes, repeat this step for each node.
Apply the changes:
tsm pending-changes apply
Step 7: Configure processes for the second node
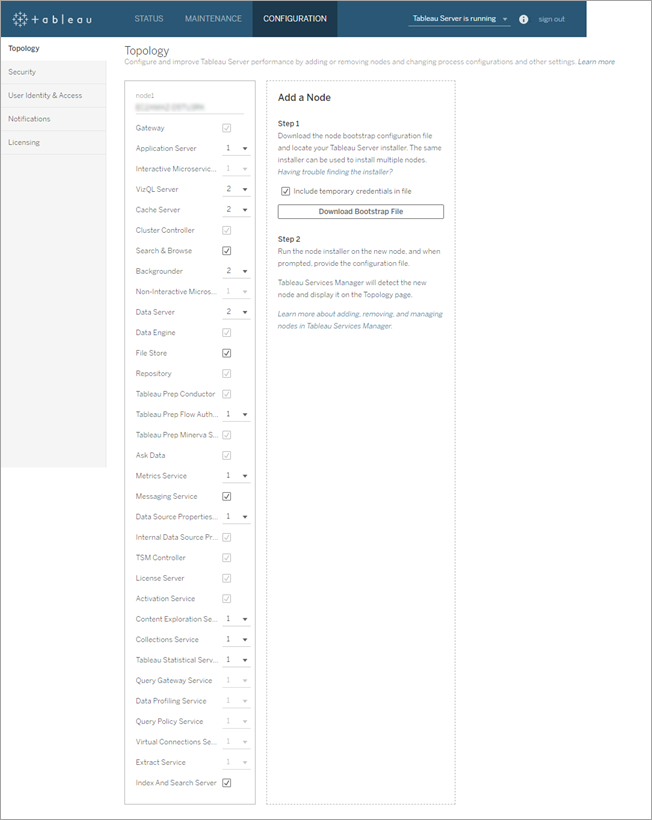
Open TSM in a browser:
https://
For more information, see Sign in to Tableau Services Manager Web UI.
Click the Configuration tab.
Specify the processes and number of instances that should run on the first additional node.
In this example:
The specific processes and process counts you set will depend on your organizational environment and needs. Some processes are added automatically when you add another process. For more information, see Configure Nodes and Tableau Server Processes.
Note: The TSM Web UI limits you to a maximum of 8 instances of processes that allow you to select the number of instances. To configure more instances than this, use the command line and the command. For more information, see tsm topology set-process.
TSM topology set-processSelect Gateway.
Set the Application Server (vizportal) count to 2.
Set the VizQL Server count to 2.
Set the Cache Server count to 2.
Select Search & Browse.
Set the Backgrounder count to 2.
Adding Backgrounder to a node will also add an instance of Data Engine if one is not already on the node.
Set the Data Server count to 2.
Select File Store.
Select Repository (pgsql).
Step 8: Configure processes for third node
In TSM, on the Configuration tab, specify the processes and number of instances that should run on the second additional node.
In this example:
Select Gateway.
Set the Application Server (vizportal) count to 2.
Set the VizQL Server count to 2.
Set the Cache Server count to 2.
Select Search & Browse.
Set the Backgrounder count to 2.
将后台程序添加到节点还将添加数据引擎的实例(如果节点上尚不存在)。
将数据服务器计数设置为 2。
选择“文件存储”。
单击页面顶部的挂起的更改:
此时将显示“挂起的更改”列表。
单击应用更改并重新启动并确认以确认重新启动 Tableau Server。
添加负载均衡器
此时,所有三个节点都有网关,用于将请求路由到可用的服务器进程。所有网关都处于活动状态,但要进一步减少群集中停机的可能性,可以配置负载均衡器。有关更多信息,请参阅 添加负载均衡器。